1. Introduction: Your Complete Guide to Adhesive Card Stock
Adhesive card stock is the secret weapon every crafter needs—whether you’re a seasoned pro or just discovering the joys of paper crafting. Imagine skipping the mess of glue, the frustration of wrinkled layers, and the endless hunt for the “right” adhesive. This guide unpacks everything you need to know: from understanding product specs like GSM and thickness, to choosing the best brands, to mastering compatibility with cutting machines. We’ll dive into material features, usage techniques, and creative project inspiration, all designed to help you craft smarter and with more confidence. Ready to transform your projects and solve those sticky crafting challenges? Let’s jump in!
Table of Contents
- 1. Introduction: Your Complete Guide to Adhesive Card Stock
- 2. Product Specifications & Buying Guide
- 3. Material Characteristics & Technical Features
- 4. Cutting Machine Compatibility Guide
- 5. Practical Usage Techniques & Pro Tips
- 6. Creative Project Ideas and Inspiration
- 7. Conclusion: Elevating Your Craft with Adhesive Card Stock
- 8. FAQ: Expert Answers to Common Questions
2. Product Specifications & Buying Guide
Adhesive card stock is more than just sticky paper—it’s a carefully engineered material that balances durability, versatility, and ease of use. In this section, we’ll break down the technical details, compare top brands, and reveal the smartest ways to buy for your needs.
2.1 Weight, Thickness and Adhesive Properties Explained
Understanding the specs behind adhesive card stock can feel like decoding a secret language, but once you know what to look for, you’ll never buy the wrong sheet again.
Weight (GSM) & Thickness (pt):
| Type | GSM (Grams/Sq Meter) | Thickness (pt/mil) | Best Use Cases |
|---|---|---|---|
| Lightweight | ~216 GSM (80lb) | ~10pt | Invitations, layering, budget projects |
| Standard/Versatile | 270 GSM (100lb) | 12–14pt | Cards, die-cuts, everyday crafts |
| Heavy-Duty/Premium | 350+ GSM (130lb+) | 16pt+ | Luxury cards, packaging, structural work |
- Professional-Grade Example: Some commercial adhesive card stocks (like 8 mil white coated tag) offer a basis weight of 120#/3300 ft², 8.7 mil caliper, and a brightness rating of 91.5%.
Adhesive Properties:
- Most premium options use an aggressive acrylic emulsion (e.g., SP924G permanent adhesive) for strong, clean bonding to a wide variety of surfaces—including corrugated and low-energy materials.
- Typical adhesive layer: ~0.6 mil thick.
- Temperature range: Serviceable from -40°F to 240°F, with a minimum application temperature of 20°F.
- Many include a scored Kraft liner for easy peeling and excellent layflat characteristics—ideal for kiss-cutting and sticker creation.
Quick Tip: The right weight and adhesive combo means your projects hold up—no more peeling corners or warped cards!
2.2 Top Brands Comparison: Silhouette, Cricut & More
Not all adhesive card stock is created equal—brand matters! Here’s how the leading names stack up, blending insights from crafters, Google results, and real-world reviews:
| Brand | Typical Weight/Texture | Price Point (per sheet) | Specialty Features |
|---|---|---|---|
| Silhouette | Canvas texture, 12x12, non-printable | ~Varies | Ideal for machine cutting, textured finish |
| Cricut Smart Paper™ | Smooth, 210gsm, 13x13 | $0.25 (10pk: $6.99) | No mat needed (Maker 3/Explore 3), easy peel |
| The Paper Studio | 65lb, solid core, non-textured | $0.11 (with discount) | Budget-friendly, Hobby Lobby exclusive |
| Recollections | 65–100lb, smooth, various sizes | $0.15 (with coupon) | Michaels exclusive, best budget pick |
| Neenah | 80–110lb, smooth, printable | $0.13–$0.21 (bulk) | Premium, archival, professional finish |
| Bazzill | 65–110lb, textured, many colors | Varies | Scrapbooking favorite, wide range |
| Papertrey Ink | 100lb, rich colors | Varies | Specialty colors, luxury crafts |
- Cricut’s Smart Paper™ stands out for mat-free use on newer machines, making it a time-saver for quick projects.
- Silhouette offers both textured and printable adhesive card stock, perfect for custom labels and embellishments.
- Neenah and Bazzill are go-tos for professionals who want archival quality and a rainbow of textures.
Pro Tip: For best value, combine store coupons (Michaels, Hobby Lobby) with bulk packs—especially if you craft often or sell your creations.
2.3 Where to Buy: Retailers and Value Tips
Finding the right adhesive card stock at the right price is an art in itself. Here’s where savvy crafters shop—and how to score the best deals:
Major Retailers:
- Walmart: Over 360 adhesive card stock products online, from colored sticker paper packs to specialty glitter sheets.
- Michaels: Recollections brand, frequent coupons (often dropping price to $0.08/sheet), wide in-store selection.
- Hobby Lobby: The Paper Studio brand, regular 40% off sales.
- Joann: Park Lane textured adhesive packs, great for photo mats and borders.
Specialty & Online:
- Silhouette & Cricut: Direct lines optimized for their machines, including printable and textured options.
- Professional Suppliers: Presslabel.com and others for large-quantity, commercial-grade orders.
- Boutique Brands: Papertrey Ink, Bazzill, My Favorite Things—best for unique colors and specialty finishes.
Value Tips:
- Coupons & Sales: Stack coupons at Michaels and Hobby Lobby for deep discounts.
- Bulk Buys: Larger packs (100+ sheets) often drop the per-sheet price significantly—ideal for business or high-volume crafters.
- Direct Sales: Specialty retailers often carry exclusive colors/textures not found in big-box stores.
Insider’s Note: The right adhesive card stock isn’t always the most expensive—it’s the one that matches your project’s needs and your machine’s capabilities.
3. Material Characteristics & Technical Features
Adhesive card stock is more than just sticky paper—it’s a fusion of textures, sizes, and technical wizardry designed to make your crafting life easier and your projects more polished. Let’s peel back the layers (pun intended!) and see what sets it apart.
3.1 Surface Textures: Canvas, Smooth & Specialty Finishes
Texture isn’t just a tactile delight—it can make or break the look and feel of your final project.
- Canvas Texture: Silhouette’s adhesive card stock in Cool Grey offers a classic canvas finish, perfect for adding a subtle, upscale touch to cards, scrapbooking, and die-cut embellishments. The canvas surface gives dimension and a professional look, especially for photo mats or statement pieces.
- Smooth Finish: Silhouette’s printable adhesive card stock (8.5” x 11”) is smooth and optimized for high-quality printing. This is your go-to for detailed images, custom stickers, and labels where clarity is key.
- Textured Varieties: Brands like Park Lane provide textured adhesive card stock in smaller sizes (4.5” x 6.5”), ideal for borders, layering, and decorative details. These sheets are easy to use in cutting machines and punches, and they don’t leave adhesive residue on blades.
Best Uses:
- Canvas: Elegant cards, wedding invites, framed art.
- Smooth: Printable projects, intricate die-cuts, stickers.
- Specialty: Photo mats, layered embellishments, unique accents.
Pro Tip: Match your texture to your project’s vibe—canvas for sophistication, smooth for print clarity, and specialty textures for creative flair.
3.2 Sizing Standards and Adhesive Backing Science
Adhesive card stock comes in a variety of sizes to fit every project and machine.
Standard Sizes:
- 12” x 12”: Scrapbooking, banners, large die-cuts (Silhouette, Cricut).
- 8.5” x 11”: Printable projects, labels, card fronts (Silhouette, most printers).
- A4 (8.27” x 11.69”): International standard, versatile for global crafters.
- 4.5” x 6.5”: Park Lane packs for photo mats, borders, and small embellishments.
Specialty Sizes:
- Legal (8.5” x 14”), 17” x 22”, and square formats (4”x4”, 5”x5”, 6”x6”) for unique projects and commercial use.
Adhesive Backing Science:
- Adhesive Type: SP924G permanent acrylic emulsion is common in premium options, offering aggressive, clean adhesion to a wide range of surfaces.
- Liner Specs: Many feature scored Kraft liners for easy removal and excellent layflat performance—crucial for kiss-cut applications and stickers.
- Temperature Resilience: Designed to perform from -40°F to 240°F, with a minimum application temp of 20°F—so your projects stick, even in tough conditions.
Fun Fact: Most adhesive card stocks are “just peel and stick”—no extra glue needed, making them a dream for quick, mess-free crafting.
3.3 Printability and Crafting Machine Optimization
Printability is where adhesive card stock really shines for custom projects.
- Printable Surfaces: Many options (like Silhouette’s printable adhesive card stock) are designed for inkjet or laser printers, letting you create high-quality, full-color labels, stickers, and embellishments.
- Thickness Considerations: Thicker cardstock may be challenging for home printers; for best results, use standard weights or opt for professional printing services.
- Coating Impact: Uncoated card stock is best for crisp, smudge-free prints. Coated options may require special settings or professional handling.
- Brightness & Opacity: High-brightness stocks (up to 91.5%) ensure vibrant colors, while high opacity prevents show-through for double-sided designs.
Crafting Machine Compatibility:
- Adhesive card stock is engineered for digital cutting machines like Silhouette Cameo, Cricut Maker, and Explore series.
- Many are optimized for “kiss cut” techniques—cutting just the top layer while leaving the liner intact, perfect for sticker sheets and intricate die-cuts.
Quick Tip: Always check your machine’s recommended settings for thickness and pressure, and test print on a single sheet before committing to a big batch.
Ready to level up your crafting? With the right adhesive card stock, your projects will stick around—and stand out—for all the right reasons.
4. Cutting Machine Compatibility Guide
Adhesive card stock is a game-changer for crafters who love precision and efficiency, but to unlock its full potential, you need to master the nuances of your digital cutting machine. Whether you’re wielding a Silhouette Cameo or a Cricut Maker, understanding mat selection, blade settings, and handling techniques is the secret to flawless cuts and frustration-free crafting. Let’s break down exactly how to get the best results—no matter your machine.
4.1 Silhouette Machine Settings & Techniques
Silhouette’s adhesive card stock is engineered for seamless integration with all Silhouette digital cutting tools, making it a top choice for Print & Cut projects, labels, and custom embellishments. According to Silhouette’s official specs and leading retailers, both their canvas-textured and smooth printable adhesive cardstocks are fully compatible with Silhouette Cameo, Portrait, and Curio models.
Optimizing Your Settings:
- Material Placement: Always load the sheet with the paper side up (adhesive side down, liner intact).
- Mat Selection: Use the Standard Cutting Mat for most adhesive card stocks. For lighter varieties, a LightGrip mat can prevent excessive stickiness.
- Blade Choice: The standard Fine-Point Blade is ideal for most adhesive-backed cardstocks. For thicker varieties, test with the Deep Cut Blade if needed.
- Cut Settings: Start with the manufacturer’s recommended settings, but always perform a test cut. Adjust blade depth and pressure as necessary to achieve a “kiss cut”—cutting through the card stock but leaving the release liner intact.
- Print & Cut: When using Silhouette’s Printable Adhesive Cardstock, leverage the Print & Cut feature for precise stickers and labels. Registration marks ensure your printed designs align perfectly with the cut lines.
Handling Textured Cardstock:
Silhouette’s Cool Grey adhesive card stock, with its canvas texture, adds a professional touch to projects. The textured surface is easy on cutting blades and doesn’t leave adhesive residue, making it a favorite for photo mats, borders, and die-cut shapes.
Pro Tip: To prevent curling, flip the mat over after cutting and gently peel the mat away from the cardstock, not the other way around. This minimizes tension and keeps your cuts crisp.
4.2 Cricut Best Practices: Mats, Blades and Pressure
Cricut users have a wide range of options, but a few key strategies ensure smooth sailing with adhesive card stock—especially if you’re toggling between Smart Paper™ and traditional adhesive-backed sheets.
Mat Requirements:
- LightGrip Mat (Blue): Best for lightweight adhesive card stock (around 65 lb/176 gsm).
- StandardGrip Mat (Green): The go-to for medium-weight options (80 lb/216 gsm and up), including most adhesive cardstocks.
- StrongGrip Mat (Purple): Reserved for heavy-duty or specialty cardstocks (100 lb/270 gsm and above).
Blade Selection:
- The Fine-Point Blade is recommended for standard adhesive card stock. For thicker materials, consider a Deep Cut Blade, but always start with a test cut.
Pressure Settings & Machine Limits:
- Cricut Maker series can handle materials up to 2.4mm thick; Explore series up to 2.0mm. If your adhesive card stock is especially rigid, check thickness and run a test cut using a similar material setting.
- Adjust pressure settings as needed—if the cut is too shallow, increase pressure; if it’s too deep, reduce it. Use the “More” or “Less” options in the Make It page.
Smart Paper™ Sticker Cardstock:
- For Cricut Maker 3 and Explore 3, Smart Paper™ can be loaded without a mat, making for ultra-fast “load and go” projects.
- For earlier machines, a mat is required.
Application Tips:
- To avoid curling or tearing, always remove the mat from the cardstock by flipping the mat over and peeling it away. This is especially important with adhesive-backed materials, which are more prone to curling due to their dual-adhesive nature (mat + product).
4.3 Advanced Techniques: Kiss Cutting and Release Liner Management
Ready to level up? Intricate cuts, sticker sheets, and layered designs all benefit from mastering advanced cutting and weeding techniques.
Kiss Cutting Mastery:
- Kiss cutting refers to slicing through the card stock layer while leaving the adhesive liner intact—essential for sticker sheets and custom labels.
- Always perform a test cut to dial in the right blade depth and pressure. The goal is a clean cut through the top layer, with the liner unscathed for easy peeling.
Release Liner Handling:
- When removing finished pieces, peel slowly and deliberately from a corner. If you encounter resistance or the adhesive starts to separate, try another corner for a cleaner release.
- For intricate designs, use a spatula or weeding tool to lift delicate elements without tearing.
- Application tape can be a lifesaver for transferring detailed adhesive-backed cuts to your project surface.
Weeding Tips:
- Adhesive card stock’s paper face is more fragile than vinyl, so use gentle pressure and specialized paper weeding tools.
- If small pieces stick to the liner, use a spatula-tip tool to nudge them free.
Troubleshooting:
- If your cuts aren’t clean or the liner is tearing, adjust blade depth or pressure and retest.
- For stubborn or curling pieces, burnish (rub) the surface gently to activate the adhesive and keep everything flat.
Quick Recap Table:
| Machine | Mat Type | Blade Type | Max Thickness | Notable Features |
|---|---|---|---|---|
| Silhouette | Standard/LightGrip | Fine-Point/Deep Cut | ~2.0mm | Print & Cut, textured options |
| Cricut Maker | StandardGrip | Fine-Point/Deep Cut | 2.4mm | Smart Paper™ matless cutting |
| Cricut Explore | StandardGrip | Fine-Point/Deep Cut | 2.0mm | Mat required for all materials |
5. Practical Usage Techniques & Pro Tips
Adhesive card stock is all about making your crafting life easier—but only if you know the tricks for flawless application and integration. Forget the mess of liquid glue and the frustration of misaligned layers. Here’s how to get pro-level results every time.
5.1 Mastering the Peel: Application Without Bubbles or Wrinkles
The secret to a smooth, professional finish? It’s all in the peel and stick.
Clean Application Techniques:
- Start by cutting your adhesive card stock to size before removing the liner. This prevents waste and ensures edge-to-edge coverage.
- Peel from one corner, pulling steadily and evenly. If the adhesive resists or splits, try another corner for a cleaner release.
- Once positioned, apply firm, even pressure from the center outward—this chases out air bubbles and ensures a strong bond.
- For textured or embossed surfaces, use extra pressure or a bone folder to press out any stubborn bubbles.
Troubleshooting Tips:
- If you spot a wrinkle, gently lift the card stock with a spatula-tip tool and reposition. Most adhesives allow for a little wiggle room before fully bonding.
- For persistent wrinkles, apply gentle heat (like a warm hand or a low-temp heat tool) and smooth outward.
Adhesive Transfer Issues:
- Occasionally, the adhesive may stick to both the liner and the card stock. Don’t panic—just try peeling from a different corner or edge.
- Keep surfaces clean and dry to avoid debris interfering with adhesion.
5.2 Vellum and Specialty Material Integration
Transparent and specialty materials like vellum can be tricky, but adhesive card stock makes seamless integration possible—if you know the right methods.
Hidden Adhesive Techniques:
- For full-panel vellum overlays, apply double-sided adhesive sheets to the entire back of the vellum before die-cutting. This conceals glue lines and preserves transparency.
- Use a bone folder to press out bubbles, achieving a glass-like, professional finish.
- For partial overlays, apply adhesive only where it will be hidden by other elements (like frames or embellishments).
Wrap-Around Method:
- For strips or borders, wrap vellum around the edge of your card or layer and adhere it on the back. This keeps the front pristine and adhesive-free.
Pro Tip: Die-cutting vellum with adhesive backing is a game-changer for shaker cards and see-through panels—no more visible glue marks!
5.3 Embellishment Adhesion: Bows, Die-Cuts and 3D Elements
Adding dimension and flair? Here’s how to make sure every embellishment sticks—and stays put.
Glue Dot Alternatives:
- Mini glue dots are a staple for bows, buttons, and tiny die-cuts. Roll or fold them for a custom fit.
- Foam adhesive strips and dots add lift for 3D effects, making layered elements pop.
Dimensional Techniques:
- For layered cards, use foam dots between layers for a floating effect.
- To turn stickers into durable embellishments, adhere them to card stock backing before cutting around the shape. Add foam backing for extra dimension.
Precision Placement:
- Use spatula-tip tools or reverse tweezers to position small elements without smudging or bending.
- For intricate die-cuts, apply adhesive only to solid areas or use double-sided adhesive sheets for a mess-free finish.
| Embellishment Type | Best Adhesive | Pro Tip |
|---|---|---|
| Bows/Ribbons | Mini glue dots | Roll dot for smaller embellishments |
| 3D Elements | Foam adhesive dots | Layer for extra dimension |
| Die-Cuts | Double-sided sheets | Apply before cutting for stickers |
| Vellum | Full-sheet adhesive | Use bone folder for smooth finish |
6. Creative Project Ideas and Inspiration
Adhesive card stock isn’t just practical—it’s the spark for endless creativity. From professional labels to wearable art, here’s how to push your crafting boundaries and make every project shine.
6.1 Professional Labels and Custom Stickers
Step-by-Step Sticker Creation:
- Design: Create your label or sticker design in your Silhouette Studio software. Add registration marks for Print & Cut accuracy.
- Print: Use Silhouette’s printable adhesive card stock (smooth finish, 8.5" x 11") in your inkjet or laser printer.
- Cut: Load the printed sheet into your Silhouette machine. Use the Print & Cut feature for precise outlines.
- Kiss Cut: Adjust blade depth and pressure for a kiss cut—cutting through the card stock but leaving the liner intact.
- Peel & Stick: Gently weed away excess material, then peel and apply your custom stickers to notebooks, jars, planners, or gifts.
Pro Tip: For intricate sticker sheets, use application tape to transfer multiple stickers at once without losing alignment.
6.2 Cardmaking and Scrapbooking Innovations
Adhesive card stock is a dream for layered cards and scrapbook layouts, especially when you want dimension without the mess.
Layered Card Designs:
- Use textured adhesive card stock (like Park Lane’s 4.5" x 6.5" packs) for borders, photo mats, and floating embellishments.
- Create dimension by layering die-cut shapes with foam adhesive dots between each layer.
- Try the “floating embellishment” trend: mount strips of adhesive card stock on clear craft plastic, then use foam tape on the back to create a see-through, dimensional effect.
Scrapbooking Flair:
- Batch-cut and pre-adhere embellishments for quick layout assembly.
- Store adhesive-backed scraps in labeled folders for easy access during future projects.
Pro Tip: For see-through elements, use the wrap-around technique or hidden adhesive placement to keep your layouts clean and professional.
6.3 Garment Labels and Wearable Art Applications
Adhesive card stock isn’t just for paper—it’s a clever solution for creating custom garment labels and wearable art.
Durable Clothing Tags:
- Print and cut your label design using adhesive card stock. For extra durability, laminate the label or cover with clear tape.
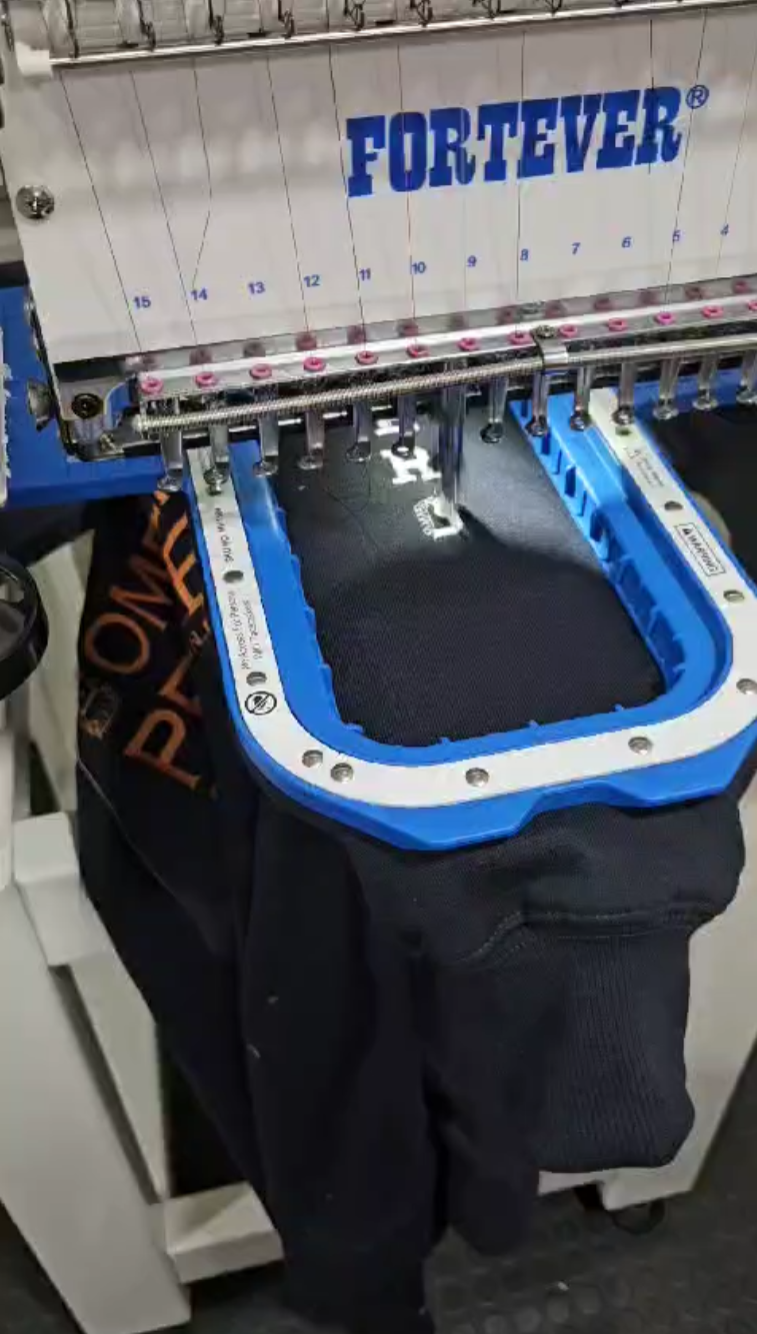
- When applying to garments, especially during embroidery decoration, stability is key. This is where Sewtalent magnetic hoops come into play—they securely hold garments in place, ensuring precise label placement and professional results.
Wearable Art:
- Use adhesive card stock for temporary patches, costume accessories, or event badges. The strong adhesive keeps designs in place, while the flexibility of the material allows for comfortable wear.
Pro Tip: When embroidering or decorating garments with adhesive-backed labels, using a magnetic embroidery hoop like Sewtalent’s helps prevent shifting and distortion, giving your wearable projects a polished, lasting finish.
Ready to try these ideas? Whether you’re making custom stickers, layered cards, or unique garment tags, adhesive card stock is your ticket to projects that stick—literally and creatively.
7. Conclusion: Elevating Your Craft with Adhesive Card Stock
Adhesive card stock isn’t just a supply—it’s a creative catalyst. By saving you time, eliminating glue mess, and delivering crisp, professional finishes, it transforms the way you craft. Whether you’re layering cards, making custom stickers, or experimenting with wearable art, its versatility unlocks new possibilities at every skill level. As you explore the techniques and ideas in this guide, don’t be afraid to experiment—sometimes the most memorable projects come from a happy accident or a new twist on a classic method. Ready to let your creativity stick? Dive in and see where adhesive card stock can take your next masterpiece.
8. FAQ: Expert Answers to Common Questions
8.1 Q: Can I Use Regular Cardstock With Adhesive Sheets?
A: Absolutely! Regular cardstock paired with adhesive sheets is a flexible alternative to pre-made adhesive card stock. This combo shines when you want to use specialty papers or custom textures not available in adhesive-backed options. It can be more cost-effective for large projects, especially if you buy adhesive sheets in bulk. However, adhesive card stock streamlines the workflow—no extra measuring or peeling, just cut, peel, and stick. If efficiency and speed are your priorities, adhesive card stock is the winner. For maximum customization or when working with unique materials, regular cardstock plus adhesive sheets gives you the freedom to create exactly what you envision.
8.2 Q: How Do I Prevent Cutting Machine Jams?
A: Cutting machine jams are a common frustration, but a few smart strategies can keep your workflow smooth. First, always use the correct mat—LightGrip for lighter card stock, StandardGrip for heavier options. Double-check your blade type and depth; a Fine-Point blade works for most adhesive card stocks, but thicker materials may need a Deep Cut blade. Run a test cut before committing to a full sheet, and adjust pressure settings as needed. Keep your mats and blades clean to prevent adhesive buildup, which can cause sticking or misalignment. And remember, always peel the mat away from the card stock (not the other way around) to minimize curling and jams.
8.3 Q: Best Practices for Fabric Projects
A: When using adhesive card stock for garment labels or wearable art, durability and stability are key. For best results, ensure the fabric is clean and dry before application. If you’re adding labels during embroidery, stabilizing the garment is crucial—this is where tools like Sewtalent magnetic hoops make a difference. They hold the fabric securely in place, preventing shifting and ensuring your adhesive-backed labels stay perfectly positioned throughout the embroidery process. For added longevity, consider laminating the label or covering it with clear tape, especially on items that will be washed or handled frequently. This combo of strong adhesive and proper stabilization guarantees your fabric projects look polished and last longer.


