1. Introduction to Smocking Embroidery
Smocking embroidery is a remarkable fusion of function and artistry, transforming simple fabric into textured, elastic surfaces adorned with intricate stitches. Originating in medieval England, smocking was once a practical solution for shaping garments—think of laborers' smocks, where flexibility and comfort were paramount before the invention of elastic. Over centuries, this technique evolved, gracing everything from agricultural workwear to delicate bodices and cuffs, and now finds its place in both heirloom and contemporary design.
Today, smocking continues to captivate creators with its blend of tradition and innovation. Whether executed by hand or with the aid of modern machines, smocking offers endless embroidery designs for embellishing garments, accessories, and home décor. In this guide, we’ll explore the essential techniques, material choices, troubleshooting tips, and inspiring project ideas that make embroidery on smocking a timeless craft for both beginners and seasoned artisans.
Table of Contents
- 1. Introduction to Smocking Embroidery
- 2. Smocking Techniques: Hand vs Machine Methods
- 3. Practical Applications in Garment and Home Decor
- 4. Material Selection Guide for Optimal Smocking
- 5. Troubleshooting Common Smocking Challenges
- 6. Historical Evolution of Smocking
- 7. Conclusion: Mastering Smocking Embroidery
- 8. FAQ: Smocking Embroidery Essentials
2. Smocking Techniques: Hand vs Machine Methods
Smocking embroidery is a dance between precision and creativity, with both hand and machine methods offering unique advantages. Let’s unravel the steps, tools, and artistry behind each approach, then help you decide which method best suits your project.
2.1 Traditional Hand Smocking: Stitches and Precision
Hand smocking is where tradition meets meticulous craftsmanship. The process begins with careful fabric preparation—marking a precise grid, usually at 2x2 cm intervals, using a chalk pencil or dot transfer paper. This grid acts as your roadmap, ensuring even pleats and stitch placement.
Once marked, the fabric is gathered into pleats by sewing along the grid lines. Practitioners often leave thread tails at both ends, enabling fine-tuned tension adjustments before securing the gathers with sturdy knots. This foundational step is crucial: it’s the secret to those satisfyingly regular pleats that define classic smocking.
With the pleats in place, the real magic begins—embroidery stitches are worked across the surface, each adding texture and structure. Essential stitches include:
- Cable Stitch: Ideal for beginners, this stitch stabilizes the top and bottom of the smocked area, forming a strong, decorative line.
- Honeycomb Stitch: Using two strands of thread, this creates a diamond pattern by stitching pleats together, adding both elasticity and visual depth.
- Outline Stitch: Perfect for defining edges and borders, providing a polished finish and extra stability.
Advanced techniques introduce decorative elements like beads or sequins, allowing for endless customization. Throughout, maintaining consistent tension is key—too tight, and the fabric puckers; too loose, and the design loses definition. The wrong side of well-executed hand smocking reveals neat triangles, a testament to your precision.
2.2 Machine Smocking: Efficiency and Modern Applications
For those seeking speed and consistency, machine smocking is a game-changer. Modern sewing machines, equipped with decorative stitches and pleating attachments, can replicate the gathered texture of traditional smocking in a fraction of the time.
The process starts with fabric preparation, often using a pleater machine—a clever device with crimped barrels and threaded needles that gathers fabric into even tucks as you turn the handle. Alternatively, you can sew parallel rows of long straight stitches and pull the threads to create pleats.
Thread selection is critical: while hand smocking favors embroidery silk or cotton, machines require thinner threads. For a bolder effect, use both a reel and bobbin of sew-all thread through the guides and needle, simulating the look of thicker embroidery threads.
Once pleated, the machine embroiders decorative stitches—stretch or zigzag stitches can mimic traditional cable or honeycomb patterns. The result? Uniform, professional-looking smocking panels, ideal for large-scale production or projects where time is of the essence.
Machine smocking shines in commercial settings, with productivity rates reaching 50 to 200 units per hour depending on the setup. However, it’s not without limitations: while it offers remarkable consistency, it can’t quite match the intricate variety or tactile richness of hand smocking.
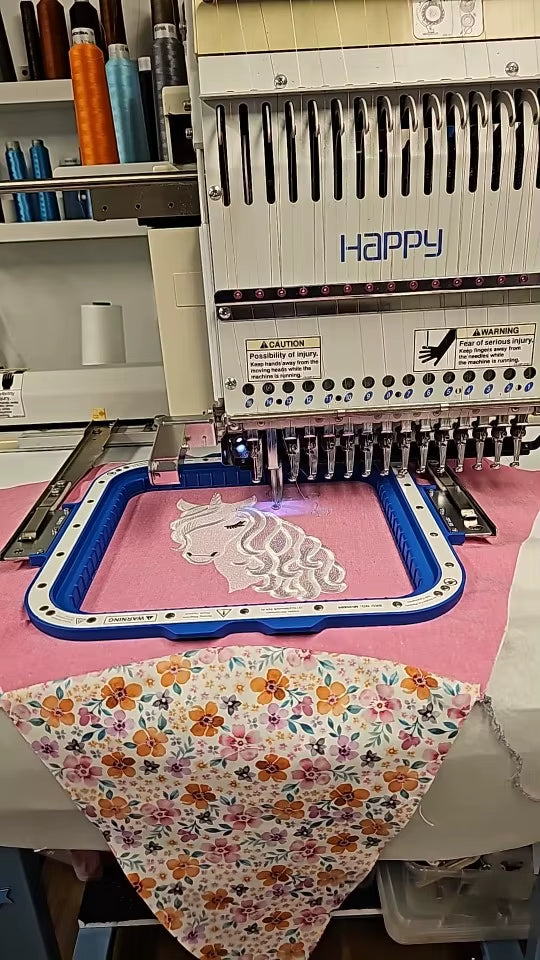
For added stability—especially when working with gathered fabrics—using a high-quality embroidery hoop is essential. Brands like Sewtalent offer hoops designed to keep pleated fabric taut, ensuring crisp, even stitches throughout your machine smocking journey.
2.3 Choosing Your Method: When to Hand-Smock vs Machine-Smock
So, which path should you take—hand or machine? The answer lies in your project’s demands and your creative vision.
- Hand Smocking: Choose this route for small-scale projects, intricate designs, or when you crave maximum flexibility and artistic control. Hand smocking excels in creating rich textures, detailed patterns, and personalized touches—think heirloom dresses, couture accents, or pieces where each stitch tells a story. It’s also the go-to for delicate fabrics or when working with complex color combinations and embellishments.
- Machine Smocking: If efficiency and uniformity are your priorities, especially for larger runs or commercial production, machine smocking is your ally. It’s perfect for items like children’s clothing, home décor, or accessories where speed and consistency matter most. Machine methods are best suited to light or medium-weight fabrics—thicker materials can overwhelm the pleating mechanisms.
Comparative studies, such as those contrasting Vietnamese hand-smocked garments with Chinese machine-produced counterparts, highlight these trade-offs: hand smocking offers unmatched design complexity and tactile appeal, while machine smocking delivers speed, durability, and standardized quality.
Ultimately, your choice may come down to scale, fabric type, and the story you want your finished piece to tell. Many modern artisans blend both methods—using machines for base pleating and hand techniques for finishing flourishes—achieving the best of both worlds.
3. Practical Applications in Garment and Home Decor
Smocking isn’t just a relic of the past—it’s a vibrant embroidery sewing technique breathing new life into contemporary fashion and décor. Whether you’re embellishing a child’s dress or adding texture to a throw pillow, smocking adapts beautifully to a wide array of projects.
3.1 Garment Embellishment: Cuffs, Bodices, and Necklines
From the runways of Liberty & Co. to everyday wardrobes, smocking has long been prized for its ability to shape and adorn garments. Its elasticity makes it ideal for cuffs, bodices, and necklines—areas where comfort and fit are as important as visual appeal.
In cuffs, smocking gathers excess fabric, creating a snug yet flexible fit that moves with the wearer. Bodices benefit from the technique’s ability to sculpt fabric to the body, offering both structure and stretch—a boon for children’s clothing or fitted blouses. Necklines, meanwhile, become focal points, with decorative stitches drawing the eye and adding a touch of vintage charm.
The technical integration of smocking into wearables requires careful planning. Begin by marking and gathering the fabric before assembling the garment, ensuring the smocked sections align perfectly with the pattern pieces. For machine embroidery on smocked garments, stability is key—using a compatible hoop, such as those from Sewtalent, helps maintain even tension and prevents distortion, especially when working with gathered or stretchy sections.
3.2 Beyond Clothing: Bags, Cushions, and Accessories
Why limit smocking to clothing? This versatile technique lends itself to a host of creative projects in home décor and accessories. Imagine a cushion adorned with wave or dragon-scale smocking patterns, transforming a simple pillow into a tactile work of art. Or picture a tote bag with a smocked panel, adding both texture and strength.
When planning these projects, keep in mind the fabric consumption ratio—smocking typically requires about three times the finished width of material to achieve full, lush gathers. Light to medium-weight fabrics like cotton lawn or silk work best, allowing the pleats to form without excessive bulk.
Experiment with different stitch patterns and scales: wave smocking creates undulating textures, while dragon-scale patterns evoke a sense of movement and depth. The possibilities are limited only by your imagination—and perhaps your fabric stash!
Smocking’s unique blend of elasticity and decoration makes it a favorite among modern makers seeking to infuse their creations with both beauty and function. Whether you’re crafting garments, home accents, or one-of-a-kind accessories, this age-old technique continues to inspire new generations of textile artists.
4. Material Selection Guide for Optimal Smocking
Selecting the right materials is the secret ingredient behind smocking that looks and feels extraordinary. The interplay of fabric, thread, and needle shapes every pleat, every shimmer, and every durable stitch. Let’s pull back the curtain on what makes a smocking project truly sing.
4.1 Fabric Choices: Cotton Lawn, Silk, and Beyond
The foundation of flawless smocking is the fabric itself. Light to medium-weight, evenly woven fabrics are the gold standard, providing the ideal balance of flexibility and structure for gathering and decorative stitching. But what does that mean in practice?
Cotton reigns supreme in the smocking world. Cotton lawn, voile, and poplin are perennial favorites—think of them as the triple threat of softness, breathability, and just the right amount of crispness. Percale cotton offers a crisp texture for sharp, formal gathers, while sateen adds a subtle sheen for special-occasion pieces. Muslin, on the lighter end, is perfect for airy, summer garments.
For those seeking a touch of luxury, silk is a showstopper. Its natural luster and drape elevate smocking to couture heights, whether you’re crafting delicate heirloom dresses or dramatic statement pieces. Linen is another natural fiber worth considering—its strength and signature wrinkles add character, though its stiffness can pose a challenge for beginners. Still, the resulting gathers are beautifully defined and exceptionally durable.
Polyester-cotton blends offer practicality: they’re easy to care for, resist wrinkles, and maintain vibrant colors, making them a smart pick for everyday wear or children’s clothing that sees frequent washing.
When it comes to fabric fullness ratios, remember: smocking is a fabric-hungry art. Most projects require at least three times the final width in material. For example, to achieve a 10-inch smocked section, start with 30 inches of fabric. Some fabrics, like batiste, can condense as much as six times for extra dense pleats, while broadcloth typically works best at a four-to-one reduction.
| Fabric Type | Recommended Fullness Ratio | Best For |
|---|---|---|
| Cotton Lawn | 3:1 | Everyday smocking, children’s wear |
| Batiste | 6:1 | Dense, delicate pleating |
| Broadcloth | 4:1 | Picture smocking, general projects |
| Silk | 3–4:1 | Luxury garments, heirloom pieces |
| Linen | 3:1 | Summer wear, textured projects |
| Poly-Cotton | 3:1 | Easy-care, vibrant designs |
Pro tip: Avoid thick or heavy fabrics—they become bulky when gathered and lose the supple, elastic quality that makes smocking so captivating.
4.2 Threads and Needles: Matching Materials to Technique
Thread is more than a means to an end in smocking—it’s a design choice. For hand smocking, embroidery silk and cotton threads are classics. Silk offers a luminous sheen for showpiece projects, while cotton provides durability and a harmonious look, especially on cotton fabrics. Pearl cotton is a premium option, its two-ply construction making stitches pop with a subtle shine.
Thread weight matters: fine threads (weight 50 or 60) are perfect for delicate fabrics and intricate work, while heavier threads (30 or 40) stand out on bolder designs or sturdier materials.
When it comes to machine smocking, traditional embroidery threads are often too thick for standard needles. The trick? Use both a reel and bobbin of sew-all thread, feeding them together through the guides and needle. This creates the illusion of a thicker thread, giving your stitches the visual weight they need without risking machine jams. If you’re working with very fine needles (size 60/70), you may need to size up to accommodate this dual-thread setup.
Needles are the unsung heroes of smocking. For handwork, a size 7 Darner is a versatile choice, accommodating both fine and medium-weight threads. For machine work, match your needle size to your thread and fabric—too small, and you’ll battle breakage; too large, and you risk unsightly holes.
Colorfastness is non-negotiable, especially for garments destined for regular washing or sun exposure. Always choose threads labeled as colorfast to keep your smocking vibrant for years to come.
In summary: the right fabric, thread, and needle combination is the backstage crew to your smocking showstopper. Take the time to experiment and sample—your finished piece will thank you.
5. Troubleshooting Common Smocking Challenges
Even the most seasoned smocker faces the occasional hiccup—uneven pleats, stubborn thread breakage, or tension that just won’t behave. Don’t let these bumps unravel your creativity! Here’s how to diagnose and fix the most common smocking pitfalls.
5.1 Solving Pleating and Gathering Issues
The beauty of smocking lies in its orderly pleats, but achieving that perfection can feel like herding cats if your prep isn’t precise. The secret? Consistent marking and careful gathering.
Start by marking your fabric with a 3/8-inch (or 1 cm) spacing—this is the sweet spot for most projects, balancing fullness with manageability. For accuracy, freezer paper templates are a game changer: iron them onto the fabric, mark your dots, and peel away for a perfectly spaced grid.
Uneven pleats often trace back to inconsistent marking or gathering thread tension. Use strong, high-quality threads for gathering, and secure both ends before you start smocking. If your fabric is slippery, stabilize it with freezer paper or a light spray of starch to keep those pleats crisp.
Fabric slippage is another common nemesis. To combat this, ensure your fabric is evenly tensioned before you begin stitching. If you’re using a hoop, make sure it’s snug but not overstretched—this will help maintain pleat integrity as you work.
5.2 Preventing Thread Breakage and Tension Errors
Nothing derails a smocking session like a snapped thread or a row of stitches that’s too tight or too loose. The fix? A little technical TLC.
For machine smocking on an embroidery machine, threading is everything. Use the dual-thread technique—feeding both reel and bobbin threads through the guides and needle—to achieve the right stitch thickness. If you’re experiencing breakage, check your needle size: very fine needles (size 60/70) may not accommodate the extra thread, so consider sizing up.
Hand smockers, consistency is your mantra. Keep your stitches uniform in size and tension, and always work with the floss in the same position (above or below the needle) for each row. This prevents irregularities and keeps your design looking sharp.
Equipment matters, too. Using a quality embroidery hoop—like those from Sewtalent—can make a world of difference, especially on complex or gathered projects. A stable hoop maintains even tension across your pleats, reducing the risk of puckering or distortion as you stitch.
If you run into loose stitches, don’t panic. Find the loose end, gently pull it from front to back, and secure it to prevent further unraveling. And remember: always remove gathering threads only after your garment is fully constructed to maintain structural integrity.
6. Historical Evolution of Smocking
Smocking’s story is woven through centuries of English history—a technique born of necessity, transformed by artistry, and preserved by tradition.
The earliest echoes of smocking appear in medieval England. Chaucer’s Canterbury Tales (1386) references a “smock” in the Miller’s Tale, while the Luttrell Psalter (circa 1340) depicts a ploughman clad in a pleated tunic. Originally, “smock” referred to women’s undergarments, but by the late 1700s, the term expanded to describe the decorated outer garments—smock-frocks—worn by male laborers.
Why did smocking emerge? Before elastic, it was the ingenious answer to making non-stretch fabrics like linen or jute flexible and comfortable for physical work. The technique involved gathering fabric into pleats and securing them with decorative stitches, creating garments that moved with the wearer and protected against the elements. These smocks were practical—waxed or oiled for rain resistance, cut from geometric shapes to minimize waste, and voluminous enough to shield clothing from dirt and sweat.
But smocking was never just about utility. The stitches—feather, chain, blanket, and stem—were often worked in the same color as the base fabric, creating subtle, elegant patterns. Regional terms like “biassing,” “gauging,” and “plaiting” reflected the technique’s spread and adaptation across English counties.
Smocks became social signifiers, too. Hiring day smocks advertised a wearer’s trade; church and wedding smocks marked important occasions. Clean smocks in church distinguished laborers from their employers, reinforcing social hierarchies while fostering community pride.
The golden age of smocking stretched from the late 18th century into the 1870s, especially in rural southern England and Wales. As industrialization took hold, smocking faded from daily wear but found new life in the folk revival and the world of fashion. Artists and bohemians embraced smocks as symbols of authenticity, while Liberty & Co. of London adapted smocking for luxurious silk dresses with fitted bodices and shaped cuffs.
Today, smocking is a decorative art, its functional roots honored in every pleat and stitch. From medieval fields to modern runways, it remains a testament to the ingenuity and creativity of textile artisans—a technique that, after seven centuries, still gathers us together in appreciation.
7. Conclusion: Mastering Smocking Embroidery
Smocking embroidery stands as a testament to the enduring marriage of function and beauty in textile arts. Whether you’re hand-smocking each pleat with meditative precision or harnessing the speed of modern machines, the core techniques remain rooted in centuries of craftsmanship. Success in smocking hinges on thoughtful material selection—lightweight, stable fabrics and quality threads—paired with a willingness to experiment and blend both hand and machine methods for the best results. As you embark on your own smocking journey, remember that stability is key: using reliable tools, such as well-designed embroidery hoops, ensures crisp, even stitches and professional finishes. With practice, creativity, and the right setup, you’ll discover that mastering smocking is less about perfection and more about enjoying the rhythmic dance of needle, thread, and gathered cloth. Happy stitching!
8. FAQ: Smocking Embroidery Essentials
8.1 Q: Can I smock thick fabrics?
A: No, thick fabrics are not suitable for smocking. The technique relies on gathering and pleating, which works best with lightweight, stable-weave materials like cotton lawn or silk. Thick fabrics become too bulky and lose the supple, elastic quality that makes smocking effective.
8.2 Q: What is the minimum fabric fullness required for smocking?
A: The minimum fabric fullness recommended for smocking is 2.5 times the finished width. Most projects use a 3:1 ratio, but never go below 2.5:1 or the pleats will lack depth and elasticity.
8.3 Q: What’s the best starter stitch for smocking beginners?
A: The cable stitch is widely regarded as the best starting point for beginners. It stabilizes the top and bottom of the smocked area, is easy to learn, and forms a strong, decorative line that builds confidence for more complex patterns.


