1. Introduction to Chainstitch Embroidery
Chainstitch embroidery is a timeless technique that weaves a bold, looping line—like a trail of interlocking links—across fabric. Its roots stretch back centuries, yet today, chainstitch is more versatile than ever, thriving in both traditional and modern textile arts. Whether you’re outlining a monogram on a denim jacket, filling a floral motif, or adding flair to home décor, chainstitch offers endless creative possibilities.
This guide is your all-in-one resource for mastering machine-based chainstitch embroidery. We’ll walk you through essential machine setup, must-have materials, and step-by-step techniques for beautiful results. You’ll also discover tips on tension, troubleshooting, and creative applications, plus a look at machine comparisons and advanced stitch variations. Whether you’re a curious beginner or a seasoned pro, you’ll find practical advice and inspiration to elevate your embroidery projects.
Table of Contents
- 1. Introduction to Chainstitch Embroidery
- 2. Machine Setup and Basic Chainstitch Techniques
- 3. Essential Materials and Machine-Specific Techniques
- 4. Comparing Chainstitch Embroidery Machines
- 5. Creative Applications on Denim and Apparel
- 6. Chainstitch Variations: Moss Stitch and Beyond
- 7. Conclusion: Mastering Chainstitch Efficiency
- 8. FAQ: Chainstitch Embroidery Essentials
2. Machine Setup and Basic Chainstitch Techniques
2.1 Step-by-Step Machine Preparation
Setting up your chainstitch embroidery machine is the first step to embroidery success. Start by securely attaching your machine to a sturdy table using hinges. For optimal speed control, connect a servo motor with a smaller pulley—this allows you to sew slowly and precisely, especially when you’re just starting out. Don’t forget to install a belt between the motor and the machine’s flywheel for smooth operation.
Next, focus on needle installation. For chainstitch embroidery, a PH-C120 chenille needle is recommended. Rotate the needle bar to the 9 o’clock position so the thread notch aligns perfectly—this ensures the looper can catch the thread and form consistent stitches. As shown in detailed YouTube demonstrations, using a rubber shoe foot is ideal for most chainstitch applications. This foot applies even pressure, protects your fabric from marks, and keeps your work looking crisp.
Before you power up, consider how much an embroidery machine costs to maintain, and double-check your setup: is the machine firmly mounted, the needle correctly positioned, and the appropriate foot attached? Taking a few extra moments here sets the stage for frustration-free stitching later on.
2.2 Threading and Tension Fundamentals
Threading your machine might feel like threading a maze, but with the right technique, it becomes second nature. Begin by inserting your thread into the needle’s large hole using a threading wire. Guide the thread through the correct path, ensuring it passes smoothly into the looper’s notch—this is crucial for forming the signature chainstitch.
Managing thread slack is equally important. With the presser foot raised, pull a bit of extra slack beneath it; this simple step prevents the fabric from sticking or bunching as you sew. To check your tension, rotate the handwheel away from you and observe how the thread catches—if it’s too loose or tight, make small adjustments until the stitches lie flat without puckering.
A handy rule of thumb: measure your thread length at 2 to 2.5 times the length of your intended stitching line. For example, a 10-inch design will need 20–25 inches of thread. This ensures you won’t run short mid-project and helps maintain even tension throughout.
2.3 Stitching Execution for Beginners
Now for the fun part—stitching! Begin by placing a tear-away stabilizer beneath your fabric. This acts as a stencil and provides support, especially for beginners. Gently pull the thread tail to maintain consistent tension as you start your outline.
Control is key, so use your servo motor’s slowest setting for your first runs. Practice moving the fabric both clockwise and counterclockwise to get a feel for how the thread flows. If you notice skipped stitches, revisit your notch alignment or check that the needle is at the correct height—these are common culprits, easily fixed with a quick adjustment.
Want to tweak your stitch aesthetics? Experiment with stitch length, height, and tension to create denser or more open patterns. YouTube slow-motion demos reveal how subtle changes can dramatically alter the look of your embroidery. Remember, every pro was once a beginner—so take your time, practice with simple outlines, and gradually work up to more complex fills or cording techniques.
3. Essential Materials and Machine-Specific Techniques
3.1 Needles, Threads, and Stabilizers
The right materials are the backbone of flawless chainstitch embroidery. Start with specialized needles: 253C or PHB1 chain stitch hooks are designed for reliable loop formation, while size 5/110/18 needles pair perfectly with 100% cotton threads, especially on machines like the Chareco 114CH. For thicker threads, such as size 3 perle cotton, opt for a larger needle like a size 18 chenille.
Your choice of thread impacts both durability and visual appeal. Polyester (40wt) is a favorite for machine embroidery, prized for its strength and vibrant colors. Mercerized cotton, like the popular "Suisse" thread, resists lint and fraying, making it ideal for textured designs. Rayon thread offers a glossy finish but may require tension tweaks or a thread net to feed smoothly. Perle cotton creates bold, dimensional effects, while stranded cotton is best for handwork or fine details.
Stabilizers are your secret weapon for crisp, professional results. Scrim felt is forgiving and easy to use, making it a great choice for beginners. Tear-away stabilizers, such as a 1.5 oz weight, provide support during stitching and peel off cleanly when you're done. For tricky fabrics, try a topping stabilizer to prevent puckering and keep your stitches sitting proud.
Don't overlook your machine's feet and accessories. The rubber shoe foot is the go-to for most chainstitch work, applying even pressure and protecting your fabric. For moss or chenille stitches, swap to a spur foot with teeth to keep the pile from compressing.
3.2 Advanced Tension and Speed Adjustments
Perfect tension is the holy grail of chainstitch embroidery. Start with a balanced, midpoint tension setting and test on scrap fabric. For delicate materials like silk or chiffon, sew slowly and use gentle tension to avoid puckering. Heavy fabrics such as denim or canvas can handle higher speeds and tighter tension, ensuring efficient, distortion-free stitching. If you're working with stretchy fabrics, moderate your speed and always use a stabilizer for best results.
There's a dance between speed and tension: faster stitching may require tighter tension to keep the thread in check, while slower speeds allow for more relaxed settings. For dense fills or multi-layer designs, increase your thread length to three times the stitching line and fine-tune your tension to prevent bunching.
3.3 Troubleshooting Common Issues
Even experienced embroiderers encounter hiccups—thread breakage, uneven stitches, or unraveling chains. The good news? Most problems are easily solved with a systematic approach:
- Skipped Stitches: Replace dull or bent needles, ensure the thread is seated properly in the tension discs (with the presser foot raised), and check the looper's notch alignment at the 9 o'clock position.
- Thread Breakage: Confirm your thread path is correct, adjust tension incrementally, and use a rubber shoe foot to prevent fabric slippage.
- Uneven Stitches: Adjust tension or needle height, and always test on scrap before moving to your main project.
- Machine Maintenance: Clean feed dogs and tension discs regularly—lint buildup can cause thread jams. A good rule of thumb is to remove lint every 40 hours of operation.
For reliable embroidery machine repairs near me when tension issues persist, maintaining stable fabric tension is crucial. Here, magnetic embroidery hoops like those from Sewtalent shine. Sewtalent magnetic hoops provide superior garment tension stability, reducing the risk of fabric shifting and uneven stitches. Thanks to their ultra-durable construction—lasting up to 40 times longer than traditional hoops—you'll spend less time on maintenance and more time creating. This durability translates into fewer interruptions and less machine downtime, making them an excellent choice for busy studios and professionals alike.
Ready to transform your embroidery workflow? With the right setup, materials, and troubleshooting know-how, you'll be stitching like a pro in no time. Keep practicing, experiment with new materials, and let your creativity lead the way!
4. Comparing Chainstitch Embroidery Machines
When it comes to chainstitch embroidery, the machine you choose is your creative engine. But with options ranging from vintage industrial workhorses to modern computerized marvels, how do you know which model fits your needs—or your ambitions? Let’s break down the key contenders, their unique features, and how they stack up for different projects.
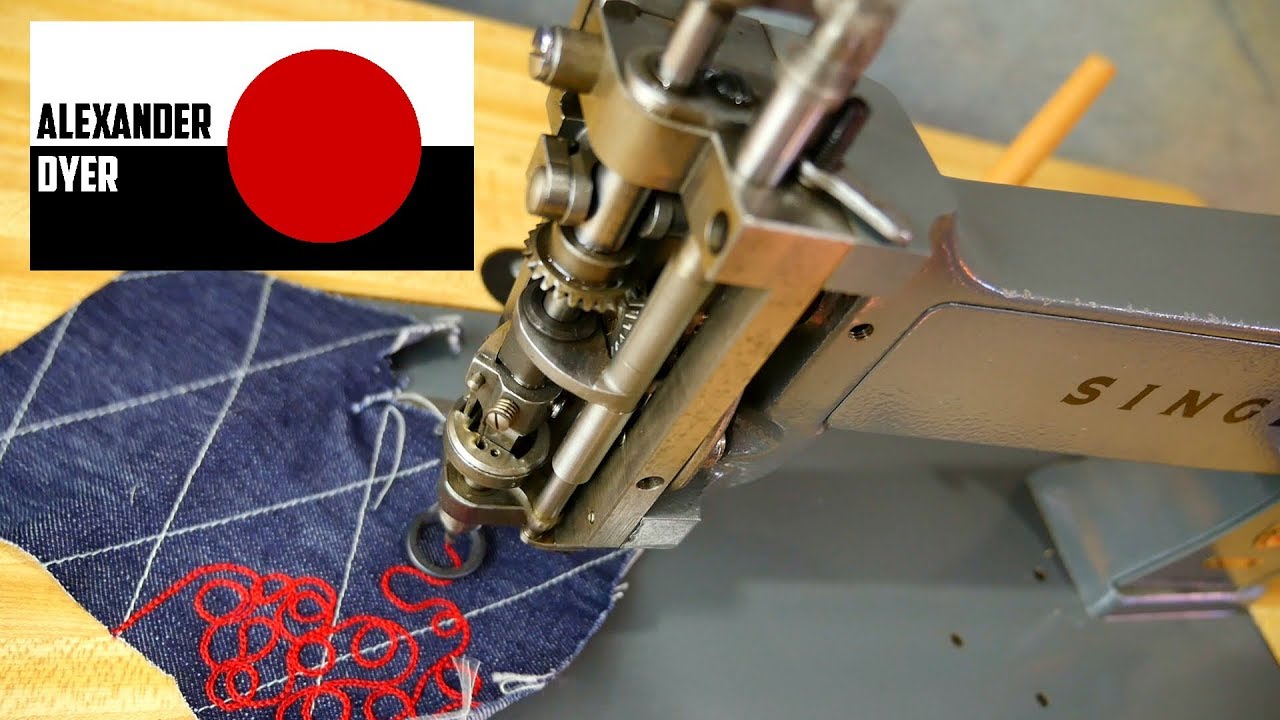
4.1 Key Models: Singer 114E103 vs. Industrial Alternatives
The Singer 114E103 industrial embroidery machine stands as a classic in the world of chainstitch embroidery. Renowned for its oscillating looper and an adjustable needle plate (accommodating sizes 1–12), this machine is engineered for ornamental work on heavy-duty fabrics like denim and canvas. Its robust construction and industrial pedigree make it a favorite for commercial studios aiming for durability and precision.
What sets the 114E103 apart? It’s not just about nostalgia. This model features a stop motion device for pinpoint control, and its manual, screw-based stitch length adjustment lets you fine-tune from 25 to 10 stitches per inch. The machine is also capable of both chainstitch and moss stitch (or chenille), with a simple 180-degree turn of a spring-loaded knob and a quick flip of the needle hook. This flexibility is a boon for those who want to experiment with textured fills and classic outlines.
But how does the Singer 114E103 measure up against modern industrial alternatives? Machines like the Consew 104-1T and computerized models such as the Brother SE2000 bring their own strengths to the table. The Consew 104-1T, for instance, is a manual chainstitch machine that excels in versatility—it can handle everything from delicate silks to thick quilts, thanks to its adaptable tension and compatibility with both standard thread and yarn. However, its speed is limited by manual operation.
On the other end, the Brother SE2000 and similar computerized models offer digital stitch length settings, touchscreens, and even multi-needle systems for color changes. Some can reach speeds of 750+ stitches per minute, making them ideal for high-volume production or intricate, digitized designs.
Here’s a quick side-by-side look:
| Feature | Singer 114E103 | Consew 104-1T | Brother SE2000 (General) |
|---|---|---|---|
| Stitch Type | Chainstitch, Moss (Chenille) | Chainstitch | Satin, Fill, Embroidery |
| Needle System | Adjustable (1–12 sizes) | Manual | Single Needle |
| Speed | Moderate (Industrial) | Manual (Slow) | High-Speed (750+ spm) |
| Fabric Handling | Heavy-duty | Versatile (Yarn to Silk) | Medium to Heavy |
| Ease of Use | Complex (Industrial) | Moderate (Manual) | User-Friendly (Touchscreen) |
| Suitability | Commercial, Heavy Fabrics | Home/Small Business | General Embroidery, Casual Use |
User Experience Spotlight: YouTube testimonials highlight the Singer 114E103’s smooth operation, especially for heavy fabrics. With a servo motor, you get precise speed control—perfect for beginners who want to take it slow and pros who need to ramp up production. Plus, maintenance is straightforward: exposed mechanisms make oiling and cleaning a breeze.
4.2 Ease of Use and Project Suitability
Choosing the right machine isn’t just about horsepower—it’s about how easily you can bring your ideas to life. The Singer 114E103, while a powerhouse, leans toward users with some technical know-how. Its industrial design means setup and maintenance require a bit of mechanical savvy, and the stop motion device, while excellent for precision, demands familiarity with manual adjustments.
The Consew 104-1T offers a more approachable entry point. Its manual controls are intuitive for basic tasks, and switching between threads or yarns is a breeze. However, if you’re tackling complex or large-scale designs, its slower pace might test your patience.
For those craving convenience, computerized models like the Brother SE2000 shine. Their touchscreens, automatic thread cutting, and multi-needle capabilities streamline the embroidery process, making them especially friendly for beginners or those working on a variety of designs. These machines are perfect for home users or small businesses that value speed and versatility over industrial-grade muscle.
Manual vs. Computerized: The Verdict
- Manual (Singer 114E103, Consew 104-1T): Best for artisans who love hands-on control, heavy fabrics, and classic chainstitch or chenille work.
- Computerized (Brother SE2000, Bernette B79): Ideal for those who want quick setup, easy operation, and the flexibility to tackle mixed-stitch projects.
Project Suitability at a Glance:
- Commercial/Heavy-Duty: Singer 114E103 or Tajima for durability and stitch consistency.
- Home/Small Business: Consew 104-1T or Brother PE535 for affordability and versatility.
- Mixed-Stitch/Digitized Designs: Brother SE2000 or Bernette B79 for speed and customization.
In short, the right machine is the one that fits your workflow, fabric choices, and creative ambitions. Whether you’re after vintage charm or modern efficiency, there’s a chainstitch machine ready to turn your ideas into stitched reality.
5. Creative Applications on Denim and Apparel
Chainstitch embroidery isn’t just a technique—it’s a passport to bold, expressive style, especially on denim and jackets. From crisp borders to intricate patches and personalized monograms, let’s explore how you can transform everyday garments into wearable art.
5.1 Decorative Lines and Patches
Chainstitch is the backbone of decorative embroidery on denim. Its interlocking loops create bold, textured lines that pop against rugged fabrics. Use it for outlining seams, tracing collars, or adding flair to buttonholes. Want to up the ante? Try the chevron stitch—a dynamic combo of diagonal and horizontal stitches that forms angular, eye-catching borders. For a touch of old-world texture, the Hungarian braided chain delivers a braided effect perfect for sleeve cuffs or yoke details.
Real-World Inspiration: Imagine using an embroidery machine for hats to create crisp white chainstitch lines on a black denim jacket—a striking contrast that’s both modern and vintage. DIYers and vintage enthusiasts often recreate classic workwear looks by adding chainstitch patches to pockets or back panels, channeling the spirit of 1970s denim.
Patches and Motifs: Chainstitch isn’t just for lines. The detached chain stitch is your go-to for standalone motifs—think flowers, stars, or custom patches. For more dimension, the Russian chain stitch wraps thread around a central chain for raised, sculptural effects, while the interlaced chain weaves a secondary thread through existing links for layered texture.
Monogramming and Personalization: Personalization is where chainstitch truly shines. Tutorials from Levi’s tailors show how to chalk out names or initials and stitch them with consistent tension for a polished look. Contrast threads—like white on black—make monograms pop, while tone-on-tone options offer subtle sophistication. Anchor stitches at the start and end keep your lettering crisp and secure.
Pro Tips for Success:
- Use thick threads for heavy chainstitch lines—a little goes a long way in creating bold, braid-like effects.
- Plan your thread usage: chainstitch can be thread-hungry, especially for full-jacket projects.
- Keep an eye on color consistency—dye lots can vary, so stock up if you’re aiming for a uniform look.
Project Ideas to Try:
1. Monogrammed Trucker Jacket: Stitch initials or names with contrasting thread for instant personality.
2. Chevron Border Denim: Frame seams or collars with angular chainstitch lines for a modern twist.
3. Hungarian Braided Pockets: Add textured chains to pocket flaps or cuffs for tactile interest.
4. Vintage-Style Back Panel: Recreate classic motifs with heavy thread and bold outlines.
By mixing and matching these techniques, you can turn any denim or jacket into a canvas for creativity—each stitch a statement, each patch a story.
5.2 Advanced Techniques: Cording and 3D Effects
Ready to take your chainstitch game to the next level? Enter the world of raised chain stitches and cording—techniques that add depth and drama to your embroidery.
Raised Chain Stitch uses thick wool yarns or multiple strands to lift stitches off the fabric, creating a plush, 3D effect. Slide threads under straight stitches to build height, or alternate thread colors within a single stitch for vibrant, multicolored motifs. The result? Embroidery that begs to be touched.
Double Chain Stitch forms an open, zig-zag pattern—perfect for decorative borders or statement accents. For even more dimension, try the two-color detached chain, alternating hues for lively, eye-catching motifs.
Digitizing and Multi-Color Threading: When working with digitizing software like Wilcom or Embird, you can assign moss stitch for fills and chainstitch for outlines, optimizing your designs for both texture and clarity. Multi-color threading strategies allow you to switch hues seamlessly, especially on machines with multi-needle systems.
Pro Tip: When creating 3D effects, use a sturdy stabilizer to support the extra weight and height of the stitches. Experiment with different yarn thicknesses and stitch heights to find the perfect balance between drama and durability.
From monogrammed trucker jackets to vintage-inspired back panels, the possibilities are as limitless as your imagination. Chainstitch embroidery on denim and apparel isn’t just a craft—it’s a conversation starter, a piece of wearable history, and a testament to your creativity.
6. Chainstitch Variations: Moss Stitch and Beyond
Chainstitch embroidery isn’t a one-trick pony. Dive deeper, and you’ll find a family of variations—each with its own personality, texture, and creative potential. Among the most celebrated is the moss stitch (also known as chenille), a staple for anyone craving plush, dimensional fills.
Moss Stitch (Chenille Embroidery): The moss stitch is all about texture. Using a hook needle with a short barb, the machine pulls thick wool or cotton yarn upward, forming dense, velvety loops. Adjust the stitch height for different effects—lower for outlines, higher for bold, tactile fills. Moss stitch is a favorite for statement lettering on jackets, logos, and backgrounds where you want the embroidery to leap off the fabric.
Chain Stitch: In contrast, the classic chain stitch forms interlocking links—ideal for outlines, borders, and monograms. Open chain stitches leave airy gaps, while double chain stitches create bold, textured lines. Machine-controlled parameters like stitch length and tension ensure uniformity, blending vintage charm with modern precision.
Switching Between Stitches: Modern chenille embroidery machines make switching between moss and chain stitches a breeze. It’s all software-driven: select your stitch type in machine embroidery digitizing software like Wilcom ES, and the machine handles the rest. Both stitches use a hook needle, but moss stitch often requires a needle with a more open barb for easy loop formation.
Design and Execution Tips:
- Size Matters: Moss stitch excels in large designs—small placements can strain the fabric or break threads.
- Fabric Support: Always use a cutaway backing to stabilize your work, as chenille stitches "push" outward during sewing.
- Shape Limitations: Avoid sharp angles in moss stitch designs; gentle curves and bold shapes work best.
- Thread Selection: Thick yarns for moss, standard embroidery threads for chainstitch.
- Efficiency: Minimize jumps between design elements to save thread and time.
Here’s a quick comparison:
| Feature | Moss Stitch | Chain Stitch |
|---|---|---|
| Texture | Dense, raised, velvety loops | Flat or textured interlocking links |
| Best For | Fills, bold designs, depth | Outlines, monograms, details |
| Yarn Thickness | Thick (wool/cotton) | Standard or thin |
| Machine Adjustments | Needle height, loop density | Stitch length, tension |
Historical Context: Chainstitch’s adaptability has kept it relevant for centuries, from ancient silk embroideries to modern machine artistry. Moss stitch, with its plush feel, brought a new dimension to chenille embroidery—making logos, varsity letters, and jacket backs pop with irresistible texture.
In Summary: Moss and chain stitches are distinct yet complementary. Moss brings the drama, chainstitch delivers the detail. With the right machine, needle, and software, you can switch between them seamlessly—unlocking a world of creative possibilities in every project.
Ready to put these insights into action? Whether you’re outlining a monogram, filling a jacket back with plush moss stitch, or experimenting with raised chain borders, the world of chainstitch embroidery is yours to explore—one loop at a time.
7. Conclusion: Mastering Chainstitch Efficiency
best embroidery machine for mastering chainstitch harmony balances tension and material, technique and creativity, patience and practice. The journey begins with understanding the importance of balanced tension, selecting the right needles and threads, and optimizing your machine’s setup for each project. Consistent use of stabilizers not only supports your stitches but also builds confidence as you experiment with new designs and fabrics.
By refining your workflow and troubleshooting proactively, you’ll discover that efficiency isn’t just about speed—it’s about making every stitch count. Over time, these small improvements lead to significant cost savings and more polished results. So keep practicing, stay curious, and let your chainstitch artistry evolve with every project.
8. FAQ: Chainstitch Embroidery Essentials
8.1 Q: What is the best thread for beginners in chainstitch embroidery?
A: Cotton and polyester threads are both excellent choices for beginners. Cotton offers a matte finish and is easy to manage, while polyester provides strength and vibrant color options. Both are widely available and perform reliably on most chainstitch machines.
8.2 Q: How can I fix loose or uneven stitches in my chainstitch embroidery?
A: Loose or uneven stitches are often caused by improper tension. Adjust your machine’s tension settings incrementally and test on scrap fabric until the stitches lay flat without puckering. Also, ensure the thread is correctly seated in the tension discs and the needle and looper are properly aligned.
8.3 Q: Can chainstitch machines create fill stitches, or are they limited to outlines?
A: Yes, modern embroidery machines for sale can create fill stitches by using moss stitch (also known as chenille) hooks and the appropriate foot. This allows you to achieve textured, plush fills in addition to the classic chainstitch outlines.
8.4 Q: What’s the basic technique for creating a chainstitch by hand or machine?
A: Bring your needle up through the fabric, then back down in the same spot, leaving a loop. Bring the needle up a stitch length ahead, passing through the loop, and gently pull to form the link. Repeat along your line, and secure the final loop with a small anchor stitch.
8.5 Q: How do I prevent my fabric from puckering during chainstitch embroidery?
A: Always use a stabilizer appropriate for your fabric type—scrim felt or tear-away options are popular. Manage thread slack under the presser foot, and avoid overtightening the tension. Testing on scrap fabric before starting your main project helps prevent puckering.
8.6 Q: Are there variations of chainstitch I should try as I advance?
A: Absolutely! Explore moss stitch for plush fills, double chain stitch for bold lines, and interlaced or braided variations for unique textures. Switching hooks and feet on your machine enables these creative techniques.
---
Curious to learn more? Revisit the earlier sections for in-depth tutorials, project ideas, and troubleshooting tips to keep your chainstitch journey moving forward!


