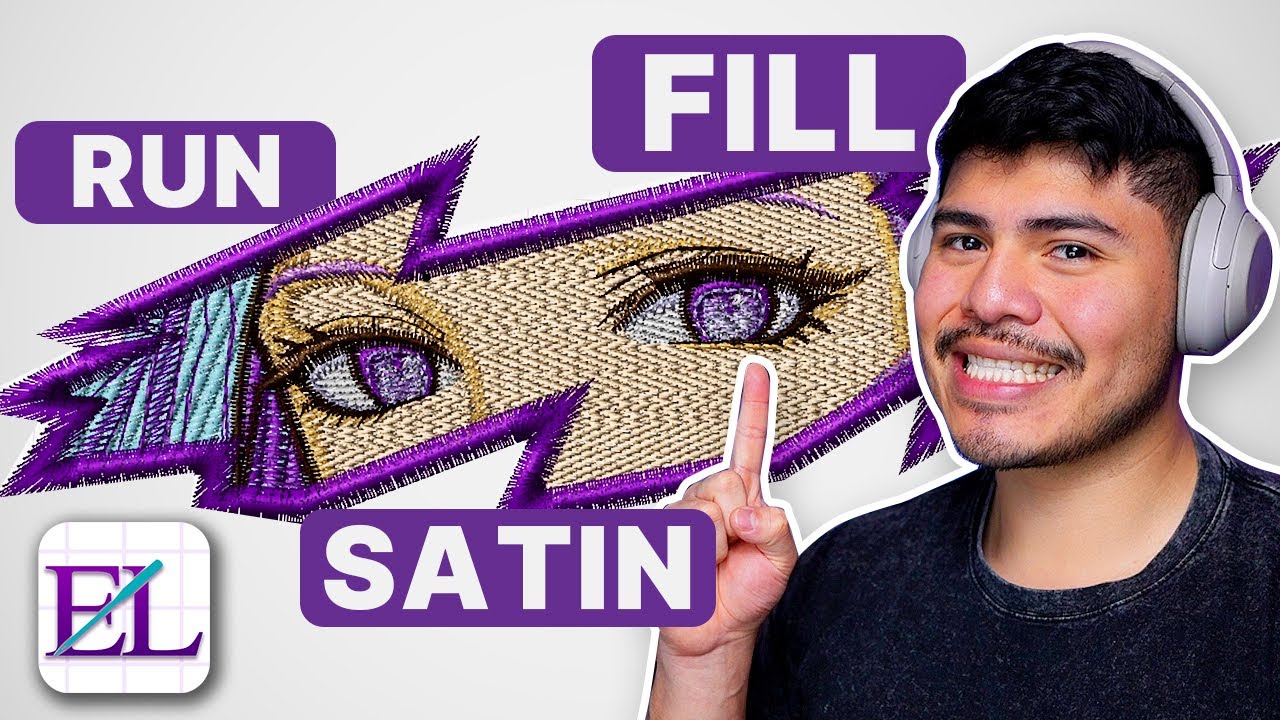
1. Introduction: Mastering Stitch Fundamentals
Machine embroidery is more than just decorating fabric—it's a dance of thread, needle, and imagination. At the heart of every breathtaking design are three fundamental stitch types: running, satin, and fill. Mastering machine embroidery applique designs is like learning the primary colors before painting a masterpiece—they are the building blocks for everything from crisp lettering to textured backgrounds and intricate motifs. In this guide, we’ll unravel the essential characteristics, technical parameters, and practical applications of each stitch type. Whether you’re a seasoned embroiderer or just threading your first needle, understanding these fundamentals will empower you to select, modify, and troubleshoot stitches for flawless results on any project.
Table of Contents
- 1. Introduction: Mastering Stitch Fundamentals
- 2. Core Stitch Types: Characteristics and Applications
- 3. Technical Parameters and Fabric Compatibility
- 4. Stitch Selection for Design Elements
- 5. Advanced Variations and Troubleshooting
- 6. Efficiency and Specialty Applications
- 7. Complex Design Execution
- 8. Conclusion: Strategic Stitch Mastery
- 9. FAQ: Machine Embroidery Stitches Demystified
2. Core Stitch Types: Characteristics and Applications
Commercial embroidery machine operations rely on three core stitch types—Running, Satin, and Fill—each with its own strengths, quirks, and ideal uses. Let’s break down what makes each stitch special and how you can harness their unique properties for your next project.
2.1 Running Stitch: The Versatile Workhorse
The running stitch is the unsung hero of embroidery—a simple, straight line of evenly spaced stitches that follows any path you draw. Think of it as the pencil sketch beneath a painting: subtle, efficient, and foundational.
Characteristics:
- Structure: A sequence of straight stitches, perfect for both straight lines and gentle curves.
- Thread Usage: Minimal, making it the most economical stitch for outlines and fine details.
- Flexibility: Easily adapts to intricate shapes and is ideal for connecting design elements without bulk.
Applications:
- Outlining: Clean borders around motifs or shapes, from classic redwork to modern line art.
- Detail Work: Adds definition to facial features, delicate accents, or textured effects like fur and fire.
- Underlay: Serves as a stabilizing base for more complex stitches, ensuring crisp, distortion-free embroidery.
Limitations:
- Boldness: Not as visually strong as bean or satin stitches for thick outlines.
- Stitch Length Constraints: For wearables, keep each stitch under 7mm to prevent thread breaks or snagging (as recommended by top embroidery resources and video guides). For non-wearables, you can stretch to about 12mm, but beware of trimming issues.
Curious how a single line can carry so much weight? Watch how experienced digitizers use running stitches to create seamless connections, hidden paths, and even entire minimalist designs—sometimes with just a few thousand stitches for an entire motif!
2.2 Satin Stitch: Precision for Polished Details
If the running stitch is your pencil, the satin stitch is your high-gloss marker—bold, shiny, and impossible to ignore. Satin stitches are dense zigzags that glide from one edge of a shape to the other, creating a smooth, lustrous finish.
Characteristics:
- Structure: Wide, closely packed zigzag stitches that reflect light for a polished look.
- Density: Uses more thread than running stitches, resulting in a solid, raised effect.
- Curvature: Excels at following curves and contours, outperforming basic zigzag stitches for smooth, flowing lines.
Applications:
- Lettering and Monograms: Crisp, readable text that stands out on hats, shirts, and patches.
- Borders and Outlines: Defines shapes with a reflective, satin-like edge.
- Solid Fills: Perfect for petals, geometric shapes, and elements where depth and sheen are desired.
Limitations:
- Width Constraints: Keep satin stitches between 1mm and 10–12mm wide. Exceeding this can cause skipped stitches, uneven coverage, or thread breakage (as noted in both expert tutorials and Google’s top-ranked guides).
- Puckering Risks: On curves or stretchy fabrics, improper stabilization can lead to puckering or distortion. Always use appropriate stabilizers and avoid excessive density, especially on delicate materials.
Pro tip: Modern embroidery software can auto-split wide satin stitches to maintain quality, but always preview your design and test on scrap fabric. And if you’re aiming for drama, try layering satin stitches with varying densities for shadow and highlight effects!
2.3 Fill Stitch: Mastering Large-Area Coverage
When you need to paint with thread, fill stitches—often called tatami or meander—are your brush. These woven patterns cover large areas efficiently, creating texture and visual depth without overwhelming the fabric.
Characteristics:
- Structure: Alternating straight stitches arranged in a brick-like or meandering pattern, mimicking woven textiles.
- Texture: Can be smooth or richly textured, depending on stitch angle, density, and pattern choice.
- Efficiency: Covers big spaces with fewer stitches than satin, making it ideal for backgrounds and solid fills.
Applications:
- Shaded Areas: Adds dimension and subtle gradients to designs.
- Patterned Fills: Offers creative textures—think fur, grass, or even brick walls—by varying preset fill patterns.
- Large-Scale Coverage: Efficiently fills backgrounds, appliqué bases, or any area where coverage matters more than edge definition.
Limitations:
- Edge Definition: Not as crisp as satin stitches for outlining; edges may appear softer or less defined.
- Density Management: Avoid spacing stitches closer than 1.5mm, as excessive density can cause stiffness or distortion, especially on thick fabrics.
| Stitch Type | Best For | Thread Usage | Edge Handling |
|---|---|---|---|
| Running | Outlines, fine details | Low | Moderate |
| Satin | Lettering, solid fills | High | Excellent |
| Fill | Textured backgrounds | Moderate | Poor |
Don’t be afraid to experiment with fill patterns and densities—switching up the angle or texture can turn a simple background into a show-stopping feature. As you gain confidence, you’ll start seeing fill stitches not just as a base, but as a canvas for creative expression.
3. Technical Parameters and Fabric Compatibility
Selecting the right stitch is only half the battle—fine-tuning technical parameters and matching them to your fabric is where true embroidery mastery begins. Let’s dive into the guidelines that keep your stitches looking sharp and your fabric free from distortion.
3.1 Stitch Length and Density Guidelines
Dialing in stitch length and density is like tuning a musical instrument: too tight, and you risk breakage; too loose, and the melody falls apart.
Running Stitch: - Stitch Length: - Wearables: Max 7mm to prevent thread breaks and distortion. - Non-wearables: Up to 12mm, but beware of trimming issues. - Density: - Use lower density (wider spacing) for fine details, higher density for bold outlines.
Satin Stitch: - Width Constraints: - Maximum: 10–12mm (risk of skipped stitches or uneven coverage above this). - Minimum: 1mm (avoid going narrower to prevent overlapping stitches). - Density: - Higher density (e.g., 0.4mm spacing) for smooth, solid coverage. - Lower density (up to 1.5mm) for lighter fills, but watch for puckering.
Fill Stitch: - Density: - High density for dense, textured fills (shading, backgrounds). - Low density for lighter, dimensional effects. - Stitch Spacing: - Avoid ≤1.5mm spacing to prevent stiffness or distortion.
| Parameter | Guidelines |
|---|---|
| Thread Weight | Match to fabric and design (e.g., 40-weight thread for dense fills). |
| Stabilizer Choice | Cut-away for stretch; tear-away for stable fabrics. |
| Testing | Always test on scrap fabric to adjust density and stitch length. |
Warning: Excessive density—especially on thick or stretchy fabrics—can lead to distortion, puckering, or thread breaks. When in doubt, lighten up!
3.2 Fabric-Specific Optimization Strategies
Every fabric has its quirks. The secret to flawless embroidery is adapting your stitch parameters and support materials to match.
Knits and Stretch Fabrics: - Use underlay stitches and stabilizers to prevent stretching and distortion. - Magnetic hoops (like Sewtalent) can help maintain even tension and reduce puckering.
Leather and Thick Materials: - Select needle types designed for leather. - Reduce stitch density to avoid perforating or tearing the material.
Sheer and Delicate Fabrics: - Use water-soluble toppers to prevent stitches from sinking in. - Opt for lighter densities and shorter stitch lengths.
Technical Materials (e.g., wires, tapes): - Adjust stitch distance and pantograph stroke for secure adhesion.
Pro Tip: Always test your design on a scrap of your chosen fabric, adjusting density and stitch length as needed. The right combination of stabilizer, needle, and stitch settings can make even the trickiest material a joy to embroider.
Ready to put these fundamentals into action? In the next sections, we’ll explore how to select the perfect stitch for specific design elements, troubleshoot common issues, and unlock advanced techniques for texture and efficiency. Stay curious—your embroidery journey is just getting started!
4. Stitch Selection for Design Elements
Choosing the best embroidery hoops isn’t just about knowing your stitches—it’s about choosing the right one for each design element. Whether you’re aiming for crisp lettering, bold borders, or textured fills, your stitch choice can make or break the final look. Let’s break down how to match stitch types to specific design needs, drawing on both expert guidelines and real-world results.
4.1 Lettering and Borders: Clarity vs. Impact
Lettering and borders are the signature details of many embroidery projects, and the stitch you select here determines both legibility and visual punch. So, how do you ensure your text pops and your outlines stay sharp?
Small Lettering (Below 0.25")
When your text is tiny—think under a quarter inch tall—clarity is king. Here, the running stitch is your best friend. Its minimal thread buildup keeps the letters crisp and prevents the muddiness that can plague small fonts. This is especially true for simple, sans-serif fonts, which maintain their form even at reduced sizes. As multiple high-ranking guides emphasize, running stitches excel at preserving detail without overwhelming the fabric.
Medium and Large Lettering (≥0.25")
As your letters grow, so does your stitch arsenal. For text at or above 0.25", the satin stitch takes center stage. Its dense, glossy finish delivers that classic, professional look—think monograms, jacket backs, or bold branding. Satin stitches create polished, readable lines that catch the light and draw the eye, making them the go-to for medium to large text.
Borders and Outlines
- Delicate Borders: The running stitch shines for fine, subtle outlines, especially around intricate motifs or when you want a hand-drawn effect.
- Bold Outlines: Enter the bean stitch (also known as triple-run). By stitching back and forth over the same path, it builds up a thicker, more prominent line—perfect for cartoon-style borders or when you want your design to really stand out. Notably, bean stitches achieve this impact with fewer stitches than satin, making them both efficient and visually effective.
| Element | Recommended Stitch | Why |
|---|---|---|
| Small text (<0.25") | Running Stitch | Prevents thread buildup, keeps letters legible |
| Medium/Large text | Satin Stitch | Crisp, shiny, and highly readable |
| Bold outlines | Bean Stitch | Thick, dimensional lines with fewer stitches |
| Fine borders | Running Stitch | Subtle, precise, and efficient |
Pro Tips for Lettering Success:
- Avoid overly detailed fonts at small sizes—simple, connected letters reduce thread trims and misalignment.
- For stretchy fabrics, stabilize with underlay stitches before applying satin to prevent distortion.
- When in doubt, test your design at actual size on scrap fabric. Sometimes what looks good on screen doesn’t translate to thread!
Curious how a bean stitch compares to satin for a bold outline? Think of it like using a marker versus a paintbrush—both make a statement, but with different texture and efficiency.
4.2 Fills and Textures: Balancing Coverage and Efficiency
When it comes to filling larger areas or adding background texture, your stitch choice shapes not just the look, but also the feel and production time of your embroidery.
Tatami Fill (Woven Pattern)
The workhorse for big, solid areas, tatami fill (sometimes called meander fill) lays down rows of stitches in a brick-like pattern. This creates a smooth, even surface ideal for backgrounds, large logos, or any spot where you want consistent coverage without excessive bulk. Tatami fills are efficient, minimizing stitch count while maximizing area coverage.
Meander Fill (Quilting-Style)
For lighter, airier backgrounds, the meander fill mimics free-motion quilting, with a looser, more organic pattern. This is perfect for adding subtle texture without weighing down the fabric—think sky, water, or abstract backgrounds.
Contour Fill (Shape-Hugging)
When your design calls for fills that follow the curves and contours of an object—like petals, leaves, or stylized flames—contour fill is your go-to. It hugs the edges, creating a dimensional, sculpted effect that brings designs to life.
Ripple Patterns and Organic Effects
Modern embroidery software (like Ink/Stitch) unlocks even more creative potential with ripple fills—programmable patterns that can spiral, undulate, or grid across a surface. These are fantastic for simulating water, wind, or simply adding a dynamic, hand-crafted feel to your work.
| Fill Type | Best For | Visual Effect | Efficiency |
|---|---|---|---|
| Tatami | Large, solid backgrounds | Smooth, woven texture | High |
| Meander | Light, textured backgrounds | Airy, organic movement | Very High |
| Contour | Shape-following fills | Dimensional, dynamic | Moderate |
| Ripple | Decorative effects | Spirals, waves, grids | Varies (software-driven) |
Pro Tips for Fills:
- Adjust density to match fabric—higher for bold coverage, lower for soft texture.
- Experiment with stitch angles and patterns to create gradients or shadow effects.
- For efficient production, use meander or tatami fills in large areas, reserving contour and ripple fills for accents.
Ever wondered how to make a background feel alive? Try layering a ripple fill over a meander base—you’ll be amazed at the organic movement and depth you can achieve!
5. Advanced Variations and Troubleshooting
Ready to elevate your embroidery from good to jaw-dropping? This section dives into advanced stitch variations for texture and dimension, plus proven troubleshooting strategies to keep your projects running smoothly.
5.1 Texture Techniques: Bean Stitch and Beyond
Texture is the secret sauce that turns flat embroidery into tactile art. Here’s how to harness advanced stitches and software-driven techniques for maximum impact:
Bean Stitch (Triple-Run Outlines)
The bean stitch is a dimensional powerhouse. By running the needle back and forth (typically three times) along the same path, it creates a raised, hand-embroidered look. Use it for:
- Bold outlines that pop off the fabric
- Faux-handmade effects on modern designs
- 3D accents without adding bulk
Modern embroidery machines from brands like Brother and Janome often include built-in triple-stitch options, making it easy to add this effect with a click.
Programmable Ripple Fills
Want movement in your backgrounds? Ripple stitch—available in software like Ink/Stitch—lets you program spirals, grids, or wavy patterns. These programmable fills are ideal for:
- Simulating water, wind, or organic textures
- Adding decorative energy to borders or backgrounds
Motif Stitches for Decorative Borders
Looking to frame your work with flair? Motif stitches—pre-set decorative patterns—can be used as borders or accents, bringing a custom touch to any project.
Hybrid and Layered Techniques
For truly unique results, blend techniques: overlay a bean stitch outline on a ripple-filled background, or combine metallic threads with contour fills for shimmering highlights.
| Technique | Effect | Best Use |
|---|---|---|
| Bean Stitch | Raised, bold outlines | Borders, faux-hand effects |
| Ripple Fill | Spirals, waves, grids | Backgrounds, movement |
| Motif Stitch | Decorative patterns | Borders, accents |
| Layered Overlays | 3D relief, depth | Multi-layered, dynamic designs |
Pro Tips:
- Use stabilizers to support heavy or layered textures and prevent distortion.
- Adjust thread tension and speed for precision—especially with dense or specialty stitches.
- Don’t be afraid to experiment—sometimes the most striking textures come from unexpected combinations!
5.2 Solving Puckering, Breaks, and Distortion
Even the best designs hit snags—literally. Here’s how to diagnose and fix the most common stitch issues:
Puckering
- Cause: Tension imbalance, excessive density, or insufficient stabilization.
- Solution:
- Layer stabilizers for extra support, especially on stretchy or delicate fabrics.
- Reduce stitch density—sometimes less is more!
- Test different stabilizer types (tear-away, cut-away, or water-soluble) to match your fabric.
Thread Breaks
- Cause: Old or inappropriate thread, worn needles, or high-speed settings.
- Solution:
- Use embroidery-specific threads for better strength and flexibility.
- Replace needles regularly and match needle type to fabric.
- Slow down the machine for complex or dense areas.
Distortion
- Cause: Poor hooping, uneven tension, or incorrect stitch selection for fabric type.
- Solution:
- Recalibrate tension settings—consult your machine’s manual for guidance.
- Use underlay stitches to stabilize designs before applying dense stitches.
- For electrical issues requiring professional embroidery machine repair near me, consider using a surge protector to safeguard your equipment.
| Problem | Common Cause | Fix |
|---|---|---|
| Puckering | Under-stabilization | Add/layer stabilizer, reduce density |
| Thread Breaks | Needle/thread issues | Use quality thread, replace needles |
| Distortion | Tension/hooping errors | Recalibrate tension, improve hooping |
| Machine Stops | Power surges | Use a surge protector |
Pro Tips:
- Always test new designs on scrap fabric before committing to your final piece.
- Keep your machine clean and well-maintained—dust and lint can wreak havoc on stitch quality.
- When in doubt, slow down. Precision beats speed every time!
6. Efficiency and Specialty Applications
Embroidery isn’t just about artistry—it’s also about working smarter. Let’s explore how stitch selection, thread choice, and modern hooping tools can save you time, thread, and sanity.
6.1 Thread Consumption and Production Speed Analysis
Not all stitches are created equal—some gobble up thread and time, while others breeze through with minimal fuss. Here’s how the main stitch types stack up:
Key Insights:
- Running stitches are your speed demons—ideal for fast, low-thread projects.
- Satin stitches look luxurious but are thread-hungry and slow down production, especially on dense designs.
- Bean stitches offer boldness with fewer stitches than satin, making them both time- and thread-efficient for outlines.
- Fill stitches balance coverage and efficiency; adjust density for cost control.
Thread Type Matters:
- Trilobal polyester threads support higher machine speeds (800+ SPM) and resist abrasion—perfect for high-volume, durable work.
- Rayon threads offer a lustrous finish but are best for slower, decorative projects.
Cost-Saving Recommendations:
- Use bean stitches for bold outlines instead of satin to cut thread and time.
- For edge-to-edge quilting, running stitches minimize rehooping and bobbin changes.
- Prioritize trilobal polyester for production runs; save rayon for special effects.
Pro Tip: For simple designs, avoid over-digitizing—extra complexity means more thread, more time, and more headaches.
6.2 Stabilizing Challenging Fabrics with Modern Hoops
Ever battled puckering, misalignment, or fabric slippage—especially on knits or leather? Enter the era of magnetic embroidery hoops, where even tension and lightning-fast setup redefine what’s possible.
How Magnetic Hoops (like Sewtalent) Change the Game:
- Even Tension Distribution: Magnetic hoops automatically adapt to fabric thickness, holding everything from delicate knits to heavy leather securely in place. This prevents distortion and reduces the risk of hoop burn or visible marks—critical for professional results.
- Dramatic Time Savings: Compared to traditional screw hoops, magnetic hoops can slash hooping time by up to 90%. What used to take three minutes now takes just thirty seconds—imagine the productivity boost for garment embroidery operations!
- User-Friendly Operation: No more wrestling with screws or risking uneven tension. The magnetic system makes hooping quick, precise, and repeatable—perfect for both beginners and high-volume shops.
Why Choose Magic Hoop Systems Like Sewtalent?
- Industry-Leading Durability: Sewtalent hoops are crafted from high-grade engineering plastics and pack more magnets than competing brands, ensuring a secure grip and long service life.
- Wide Compatibility: With over 17 sizes and support for hundreds of machine models, Sewtalent adapts to virtually any garment embroidery scenario.
- Real-World Results: Users rave about reduced fabric waste, fewer defects, and a noticeable uptick in production speed.
| Hoop Type | Hooping Time per Garment | Tension Consistency | Fabric Protection | Ideal For |
|---|---|---|---|---|
| Traditional Screw Hoop | ~3 minutes | Variable | Moderate | Occasional, low-volume use |
| Sewtalent Magnetic Hoop | ~30 seconds | High | Excellent | High-volume, pro garment embroidery |
Pro Tip: If you’re tired of fighting with screw hoops or losing time to fabric misalignment, consider upgrading to a magnetic hooping system like Sewtalent. It’s like switching from a hand saw to a power tool—once you try it, you’ll never look back.
Ready to take your embroidery to the next level? In the next section, we’ll dive into complex design execution—layering stitches, advanced hooping techniques, and more. Stay tuned for the secrets that separate hobbyists from true embroidery masters!
7. Complex Design Execution
When considering an embroidery sewing machine for sale, true embroidery artistry emerges when you layer, blend, and align stitches for depth, shadow, and three-dimensional effects. This section unveils how to combine stitch types and leverage advanced hooping systems to bring even the most ambitious designs to life.7.1 Layering Stitches for Dimension and Shadows
Ever wondered how embroidery designs leap off the fabric with sculpted petals, subtle gradients, or dramatic shadows? The secret lies in strategic layering and stitch combinations: **Satin + Fill Stitch Combinations** Pairing satin and fill stitches is a classic move for dimensional effects. Satin stitches deliver smooth, dense highlights—perfect for the raised edge of a petal or the bold sweep of a monogram. Fill stitches (like tatami or meander) add textured shading or subtle gradients beneath or beside those satin lines. For example, embroider a flower’s outer edge in satin for shine, then use fill stitches in the center to create depth and shadow. This approach is echoed in Wilcom’s contour fill techniques, which follow the natural curves of a design to mimic light and form. **Underlay Stitches for Structural Depth** Before piling on decorative layers, underlay stitches (often running stitches) provide essential stability. These hidden foundations prevent puckering and distortion, especially when stacking multiple stitch types. Think of underlays as the scaffolding that lets your design stand tall—without them, your 3D effects might collapse into a wrinkled mess. **Bean + Zigzag for Bold Borders** For outlines that demand attention, layer a bean stitch (triple-run) with a zigzag edge. The bean stitch builds up thickness, while the zigzag adds movement and visual interest. This combo is a favorite for geometric patterns and cartoon-style borders. **Material and Thread Synergies** Don’t overlook your fabric and thread choices—they’re the supporting cast in this dimensional drama. Metallic or transparent threads over contrasting fabrics create luminous overlays, while varying thread weights (from delicate single-strand to chunky metallics) amplify texture and relief.| Stitch Combo | Effect | Best Use |
|---|---|---|
| Satin + Fill | Shading, texture, depth | Florals, landscapes |
| Bean + Zigzag | Bold, dynamic outlines | Borders, geometric motifs |
| Underlay + Satin | Stable, multi-layer fills | 3D appliqué, intricate art |
7.2 Precision Techniques with Advanced Hooping Systems
Complex, multi-layered embroidery demands more than just clever stitching—it requires rock-solid fabric stability and pinpoint alignment. Enter advanced hooping systems like the **HoopTalent Hooping Station** and **Sewtalent magnetic embroidery hoops**, which are game-changers for executing intricate designs on garments. **Multi-Layer Alignment for 3D and Appliqué** Hooping stations such as HoopTalent provide a stable platform for aligning multiple fabric layers, foam inserts, or appliqué pieces. With precise positioning guides, you can ensure each layer lands exactly where it should—critical for 3D foam effects or detailed appliqué overlays. **Sewtalent’s Alignment Markings: Accuracy Made Easy** Sewtalent magnetic embroidery hoops are engineered for garment embroidery, not caps, and feature built-in alignment markings on the arms and top frame. These reference lines help you quickly and accurately position your fabric, keeping complex, layered designs perfectly registered—even across multiple hoopings. **Why This Matters:** - **Reduces Misalignment:** No more off-kilter shadows or mismatched layers—every element lines up as intended. - **Speeds Up Production:** Magnetic hoops and hooping stations slash setup time, letting you focus on creativity instead of wrangling fabric. - **Protects Delicate Layers:** Even tension distribution prevents distortion, crucial when stacking foam, appliqué, or specialty threads. **Real-World Workflow:** Picture this: You’re stitching a 3D appliqué logo on a sweatshirt. First, you use the HoopTalent station to align your base fabric. Next, Sewtalent’s magnetic hoop locks everything in place with even tension. As you layer foam and fabric, the built-in markings ensure each step lands with surgical precision. The result? A flawless, dimensional design that looks—and feels—professional. **Pro Tip:** For truly complex, multi-hoop designs, mark your alignment points on both the fabric and the hoop’s reference lines. This simple habit can save hours of frustration and wasted materials. ---8. Conclusion: Strategic Stitch Mastery
Choosing the right machine embroidery stitch is both an art and a science. Match your stitch type to the size and purpose of each design element, prioritize fabric and stabilizer synergy, and don’t shy away from creative variations that boost efficiency. With digital preview tools and a willingness to experiment, you’ll unlock new dimensions in your embroidery projects. Remember: the journey from good to flawless embroidery is paved with curiosity, practice, and a dash of boldness.
9. FAQ: Machine Embroidery Stitches Demystified
9.1 Q: What's the maximum satin stitch width before quality drops?
A: Most embroidery machines recommend keeping satin stitches within 10–12mm in width. Going wider can lead to skipped stitches and uneven coverage, so it’s best to stay within this range for optimal results.
9.2 Q: Can running stitches replace satin for curved lettering?
A: Yes—running stitches are often the better choice for curved lettering below 2mm in width. They handle tight curves with greater flexibility and clarity, making them ideal for fine, detailed text.
9.3 Q: How do I prevent thread breaks on dense fills?
A: To avoid thread breaks with dense fill stitches, reduce the stitch density, use embroidery-specific threads, and regularly check your needle’s condition. Proper maintenance and thoughtful digitizing are key to smooth, trouble-free embroidery.


